Tuesday, July 25, 2023

Sickles Hammered!

Last night Jonathan hosted a remote game for the Rejects.  It was Hoods assault, to which I will refer you to his excellent report at Palouse Wargaming Journal.

My screen shots are few in number and I won't even try to record the details in what, from the Federal (me and Ray) point of view was calamitous. 

As the opponents faced each other it was clear that engagement was going to be immediate.

Positions at the start of the game.

The Confederates swept away our sharpshooters and quickly bounded forward.

Realising that the rebels were going to move fast and wherever possible double up their charging units, the Federal command made a possibly ill-conceived decision to thicken the defence.  However, this then did three things:
1. Made them a dense target for small arms and artillery.
2. Gave the confederates the initiative to either fire, charge or both.
3. Whenever the boys in blue charged to repel the rebels they were left exposed to points 1 and 2 above.

Positions at the start of turn two

The rebels were able to push onto Houck's Ridge and repulse any counterattack.  They also maintained pressure on Little Round Top. De Trobriand's brigade on Stony Hill engaged in a fairly active, but largely peripheral, defence.

Positions at the start of turn three

The last turn saw the rebels pushed off Houck's Ridge, only to swiftly climb back up.  Little Round Top was taken before Vincent could really reorganise to muster a defence.  When Weed's newly arrived brigade attacked it was thrown back; as were other Federal counter-attacks.  Rebel casualties were being inflicted but the effort drained the defenders' resources.  The Federal troops had no choice but to withdraw.

The Confederate commanders, Lee and Surjit need to congratulated on playing everything right.

Excellent game which I enjoyed regardless of the result.  The after game group analysis providing almost as much entertainment.  

Next time I would try out a more agile defence with two lines.  The second on reserve to hopefully stiffen the front when attacked.  I also believe the maintenance of Stony Hill is less necessary and kept valuable resources away from reinforcing Houck's Ridge and Little Round Top.  Hopefully, these thoughts can be put to the test.


Thursday, July 13, 2023

Battle of Quoideneuf, French Revolutionary War AAR

Last weekend a diminished complement of Rejects assembled for a fictional French Revolutionary Wars scenario.  We used Volley and Bayonet rules and deployed Commission Figurines 6mm MDF miniatures.

This was the first time we had played these rules face to face, and on a large table. Up to now on a 6x4 table, but on this occasion on a 8x6 battlefield.  So, we were all looking forward to seeing how things played out on this larger arena.  Plus, Surjit and Steve were keen to understand the rules better in anticipation of campaign battles.  More on this in a future post.

The Context
Put simply, it was a encounter between two roughly equal sides. 

Victory would come from taking and holding the opponent's line of communication or having less divisions exhausted.

The Sides
Apologies for the poor quality reproductions of the orders of battle.

The Austrians - Stuart and Surjit.


The French - Steve.


The Battle
With the French on the right, they advanced all along the line.  With all their cavalry placed on their right flank, Massena and Bonaparte push across the stream.  The Austrians (on the left), having divided their cavalry on both flanks decided that they needed to react to this and rapidly sought to redeploy their horse to cover the far flank.

Stuart and Surjit react to Steve's advance.

The Austrians manage to race their dragoons to the far flank just before the French cavalry emerged from the orchards.  Along the rest of their line imperial forces adopted a defensive posture in the hope that the French would break against them.

The Austrians use the large, dense woods to anchor their centre, and trust to their cavalry to protect the more open far flank.


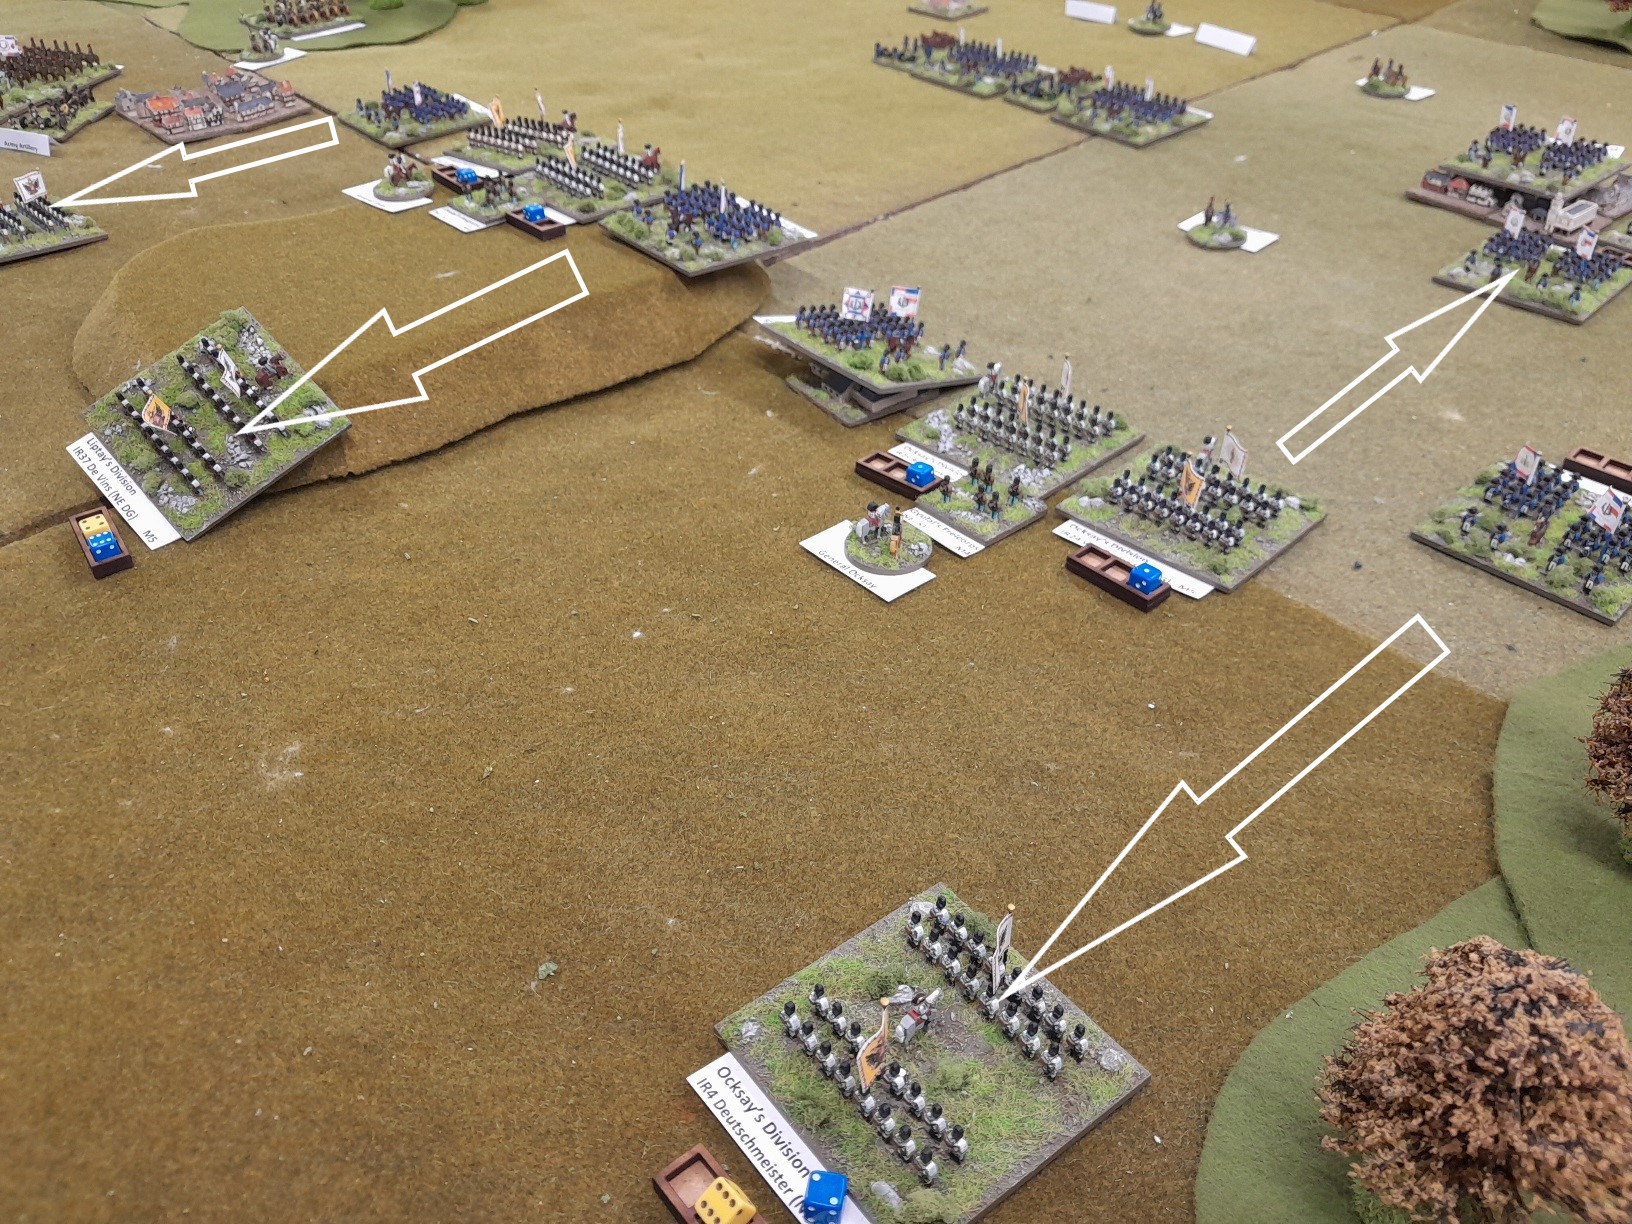
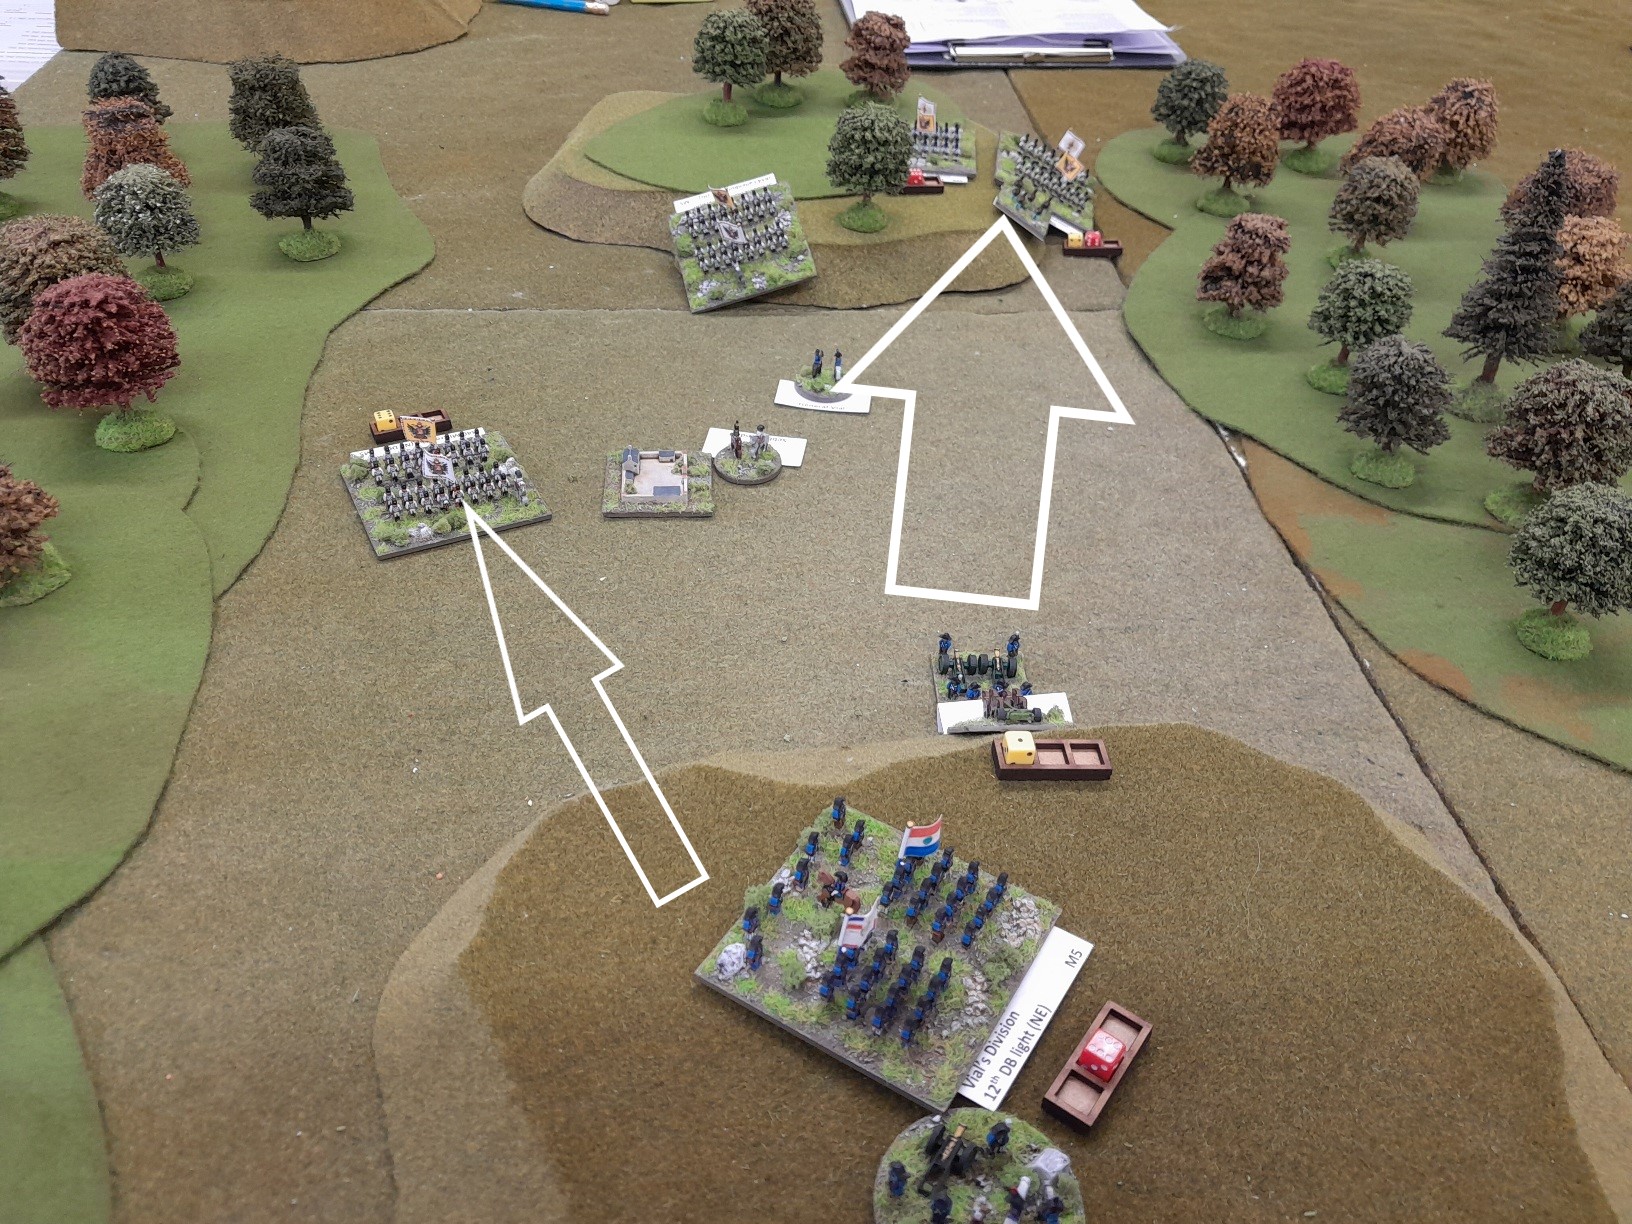
Hoping to smash the near flank, the French commander threw Vial's division at the Austrians on the hill.  Whilst maximising their position and stationary posture, Sebottendorf's division repulsed the assault.


And attempted to seize the opportunity to open up the French flank.  At this point the French commander was showing signs of a collapse of morale, and as he munched on his lunch he predicted that not half an hour would pass before the battle was concluded.


However, fortune is not a faithful mistress and quickly turned away from the Austrians as French columns assaulted the centre, driving back or routing four imperial regiments.


Even the far flank was looking brittle.


From near morale collapse to feelings of invincibility, the French commander was now taking the fight to the slightly stunned Austrians.

Steve and his renewed luck... he needed sixes!

On the far flank, all the cavalry engaged with the French maximising their horse artillery advantage.


With honours edging towards the French, it nonetheless looked likely that all mounted divisions would exhaust themselves.


The Austrian position all along the line was being tested by the newly invigorated and confident French.


However, the Austrians were inducing some nervous tension on the French right (near) flank.  With Sebottendorf's division throwing themselves at the well placed guns and a recovering demi-brigade, Austrian expectations hoped for a breakthrough.


Alas, sterling gallic defence and a reasonable amount of good fortune repelled the attack.  However, both divisions had exhausted themselves in their mutual efforts.  The brave men of Vial's division nonetheless held their morale, whilst Sebottendorf's collapsed.  Two regiments scattered and a third would rout.  The battle for this flank was over.


Meanwhile, the Austrian command was working hard to recover the centre.  Especially now that the hill seemed about to be flanked.

The French, though bloodied, could scent victory and with undamaged reserves ready to throw forward with artillery support the battle seemed now to have swung in their favour.


With a central division approaching exhaustion, the Austrians made the decision that this would be an opportune moment to retire in good order.  Well timed as the God of War (me) was about to call the battle to a conclusion.

The rather more confused situation at the end of the game.  Both flanks were exhausted and the Austrian centre was giving ground.

Conclusion
A French victory in what was a close match.

The players enjoyed the battle more from the point of view of learning more about the nuances of the rules and how to handle the units than from any desire to desperately win.  Their stream of questions was constant.  They seemed to gain a greater understanding of the advantages and disadvantages of batteries versus detached guns.

From my perspective it was really interesting to see how the players made use of the bigger table.  I'm not sure it actually made a lot of difference in this game.  Primarily because the two armies were too evenly balanced, which made for bold advances followed by calculated caution in the knowledge that the balance might be broken against them.  Plus, it made us all think about the wisdom of only seeking battle with distinct numeric or qualitative advantages.  This game was too balanced, and so could easily swing on small events or lucky dice rolls.

Nonetheless, a excellent and enjoyable day full of banter, laughter and great conversation.


Tuesday, July 4, 2023

Mad for War at Rapture, Part Two

So this was day two at the show. On day one, the Dutch had successfully got past Sheerness to enter the River Medway, and broken through the chain defence to capture the English flagship.

Today the Dutch (me, Lee and Steve) mission was to round the bend, pass Upnor Castle and destroy three moored English (Ray and Stuart) warships. Any damage on the dockyard itself would gain the Dutch extra honours.

Apart from Postie looking pensive, you can see the River Medway bending on the right when the Dutch are starting from, round past Upnor Castle and onto the dockyards on the left.

Dutch spirits were high after yesterday. Would their martial vigour and seamanship bring final victory?

The Dutch are on their way!  However, trying not to get in a tangle is a test of our seamanship.  Wisely, I'm in front with the warships Utrecht and Vrede, and the admiral's yacht.  The thing that concerned us most was the wind; it was fully against us as we rounded the bend.
English shore batteries were also firing at us, but to little effect... at the moment!

Dutch progress is slow, even the Utrecht and Vrede are now struggling against a prevailing south-westerly.  When sailing into the wind there is a risk of not moving (going into "irons").  I should also say that within 2 inches of the bank there is a risk of being grounded... there was quite a bit of that happening!

Admiral de Ruyter's yacht races ahead rather alarmingly close towards the guns at Upnor Castle.  The Utrecht and Vrede not far behind.  By now the whole force is struggling to move.

Meanwhile, the English have been enjoying some luck in getting scratch crews together and launching some ships.  Fireships amongst them.  You may also just see emerging from the creek on the right some rowing boats containing soldiers with the intent of boarding to capture and/or delay the raiders.
Of course if the wind is against the Dutch it is with the English.

The wind changes direction slightly.  Unfortunately for the Dutch it actually makes matters worse, with Steve and Lee failing to move or struggling to avoid grounding their vessels.
In the meantime, with a smart bit of seamanship, de Ruyter's yacht swings around to move away from the approaching English soldiers and the shooting from Upnor Castle.

The Vrede now leads the Dutch with the Utrecht slowly following.  More English vessels are moving aggressively towards the raiders, whilst the rest of the Dutch fleet make painful progress.  By this point two Dutch fireships are being towed by rowing boats to ensure at least some movement.

With the Vrede opposite Upnor Castle, the English try to board but are repelled.

The English have been busy in more ways than one.  Having carefully positioned a fireship they successfully light it and let it sail into the Vrede.  Fortunately, the crew are skilled and well drilled and with bill hooks and poles manage to push and manage the blazing hulk away and past the Dutch man of war.

The English are striking lucky at the moment.  A shore battery scores a hit on a ship struggling round the bend.  It just happens to be a fireship, which promptly explodes.  This now means that all vessels close enough must test for damage.

It just so happens that all the ships that tested and failed were also Dutch fireships.  They all catch fire!

Aside - I should comment that at the point when the tests for the ships had to be made a member of the public was watching.  I asked if he would like to roll the dice.  He did, and contributed significantly to the drama!  How we laughed... especially the English.

The blazing wrecks now made navigating the river a little trickier.


With the target moored battleships in sight, De Ruyter's yacht makes a move to board one to set it ablaze.  However, the crafty English manoeuvre a vessel between the yacht and the Vrede, firing broadsides at both.  De Ruyter gets into a boat, abandons the stricken yacht and joins the Utrecht.

Meanwhile, another English fireship is lit and accurately sent into one of Steve's warships.

Alas, Steve now has problems as his ship catches fire.

But with swift work and a well disciplined crew, Steve is able to extinguish the flames and see the English fireship drift away.

While Steve puts out fires.  The Utrecht starts making fires of its own!
The English attempt to board the Utrecht and get roundly beaten, surrenders (strike their colours) and De Ruyter decides to burn it.

A much reduced Dutch fleet slowly rounds the bend, gallantly struggling against the wind as it changes direction... but only to blow even more directly into the Dutch.

The Vrede beats off more attempted boarding actions from English soldiers before delivering a massive broadside that causes an English frigate to explode.
However, with English ships anchored and blocking the approach to the target the Dutch decide they now have to cut their losses and sail home.

Conclusion
The games were brilliant and the rules worked in such a way that gave the feel of needing to think like a ships captain and the excitement of action and drama.  I liked them that much I bought the rules.

I should add that Barry Hilton was a fantastic, approachable, affable, good hearted chap who made the experience and learning the rules a joy.  Check out his YouTube channel here.


As for the battle, the English played well in getting sufficient sailors and troops to man a defence and to then cause mayhem with their use.  

The Dutch struggled valiantly against the wind and engaged in some superb navigating to pose a threat.  As the Dutch fleet became separated and strung out, the Vrede was consistently in the thick of the action.  However, it saw off all attacks and boarding actions.  It was grievously damaged but proudly able to sail home to a hero's welcome. 

History was changed.  Did it matter? Not a jot as a great time was had by all.  Plus, it left us Dutch with a greater appreciation of the audacious nature of the real raid and the tremendous skill that was required.


Saturday, July 1, 2023

Mad for War at Rapture, Part One

At the weekend the Rejects were at Rapture Gaming Festival at the Historic Chatham Dockyards.  

We enjoyed the opportunity in assisting the excellent and affable Barry Hilton, of League of Augsburg fame and author of Mad for War naval rules, to demonstrate his game of the Dutch Raid on the Medway, 1667.

Before I report on the game, let me share the excellent vessels at the dockyard.  All of which can be explored on board.  There is so much more at the docks and is well worth the visit

HMS Gannet, a sloop of the Victorian Royal Navy.  Built in 1878.

HMS Ocelot, launched in 1962 it was the last Royal Navy warship built at Chatham Docks.

HMS Cavalier, a CA Class Destroyer launched in 1944

And onto the game!

In short, this is the 2nd Anglo-Dutch War.  The Dutch want revenge for a raid that the English did the year before.  The English navy had been run down and neglected as royal coffers were empty for a number of reasons, recovering from the Great Fire of London in 1666 being just one of them.  The Dutch entered the Thames estuary attacked Sheerness and gained entrance to the River Medway where they proceeded to wreak havoc.  They captured the English flagship.  In all over 30 English ships were sunk, burnt or captured.  It was a disaster!  warning: there are better and fuller histories to be found.

Barry's board with a view over the Royal Chatham Docks of 1667.  The buildings are 2mm models from Brigade Models and the ships are 1/2400 scale.

Some English ships on the river Medway.

The first game we played represented the Dutch approaching Sheerness and seeking to pass the English and gain entrance to the Medway.  As an aside, and as someone who used to live in Chatham, the River Medway is affectionately and accurately also referred to as the River Mudway!

The Dutch have to get at least two ships off the table to the right of the fort that can be seen in the distance.

The English have fireships, which gives the Dutch something to think about.

The Dutch engage closely while the English light their second fireship.  Alas one misses and the other explodes doing damage but not enough to stop the Dutch gaining the River Medway.  Score one for the Dutch.

The second game represented the Dutch approaching the chain barrier that was stretched across the river to stop raiders.  To win the Dutch had to break through and capture the Royal Charles, the English flagship, before it can be towed to safety.

Barry explaining the scenario and ships to the Rejects.

The Dutch, on the right, approach the chain barrier as shore batteries open fire... to little effect.


The first Dutch ships break the chain, but now approach English gun ships.

However, the lead ships quickly neutralise their threat.

And continue to move on.

However, the river is narrow and the Dutch find themselves getting in each others way.

As the Dutch captains struggle to make sense of the situation and navigate the river and obstacles, the English are now towing the Royal Charles away.  However, one ship finds space and the chase is on.

The Royal Charles just needs to be towed off the table.  At the last moment the Dutch catch up and manage to execute a boarding action.  The English flagship is captured with nothing to spare. Phew!

So far the Dutch are on course to raid the dockyard... just.

With not enough time to play the last game, we opted for a short open clash.

The Dutch start in the bottom left. The English start with the wind advantage.

The English quickly engage.

And blow a Dutch warship out of the water.

However, the Dutch recover some equilibrium and the English suffer as this ship is raked from the bow.

And boarding actions are conducted, with the Dutch capturing two English ships.

Apologies for the poor battle reports.  A lot was happening with the games being very immersive.  A real credit to the rules which ensured close, tense and thoroughly enjoyable games

The next post will show the attack past Upnor Castle and on the docks themselves.