Tuesday, March 29, 2022

Aerial Shoot-Out

Rather bizarrely, two years after the the first covid lockdown in the UK I decide to host a remote game via Zoom.

The Rejects hold a weekly "Paint and Chat" Zoom get together, and this afforded me the opportunity.

I chose to do something very simple as a debut.  What I did not want was to become bogged down with handling technology as well as dealing with formations, wheeling etc. of troops.  I also wanted to limited the dice rolling and factors.  So, we did a little World War Two aerial combat.

Only three of the Rejects could make it - Lee, Steve and David.

The rules were very simple, not very nuanced, but enjoyable (from PZ8).  Certainly not the rules I would use if we were playing around a table.  Because of the speed of play, I decided to base it as a series of combats with each player accumulating points and experience.

I wanted this to be more fun than historical.  So, each player had a Spitfire and the play was basically a "shoot-out" in the form of a league.  The winner would be determined by the number of kills and survived sorties.
3 points for a kill
1 point for survived a sortie
In the event of a draw the winner would be the higher ranked player.

I figured the games would go quickly and we'd get in between 4 and 6 sorties.  I was soon disabused of this notion.  I have never encountered such a careful, cagey set of players.  There was good banter, dynamic aerobatics and considerable thinking and pondering.  I guess that this is normal whenever hex movement is introduced alongside a third dimension.  In the end, we got three games in.

The fight is on.  The smoke from Lee's plane shows that he has already been hit and is dangerously damaged.

Birds eye view... a very high bird that is!

David is desperately trying to escape Lee's attention.


David's only hope is to try to survive the sortie by reaching the Stella Artois of Safety.

The results
Steve got an early kill but was quickly shot down in turn.  One kill, so 3 points.
David survived one sortie and got a kill, so 4 points.
Lee after being killed in the first sortie become absolutely deadly with three kills in total, surviving one sortie and reaching the honour of an average pilot gained him 10 points.

The rules worked perfectly in this setting.  I enjoyed the occasion, and the decision to keep it simple with rules and hex movement really meant that the focus was on the game not on the technology or my attempts to adapt to gaming with it.


Next time I may try using a more complex set of rules which I think may have some merit for remote Zoom games.  Again, not a set I'd use at a live table, but Check Your Six with it's movement plotting may have some potential in the Zoom arena.  Not sure, just mulling it over.

The mind is pondering over the possibilities.


Thursday, March 24, 2022

Rivoli Scenario Adjustments Tested

In a previous post I tested out a scenario and rules for the Battle of Rivoli, 14 January 1797, see here.

The aims of this scenario test are:

  1. To test using the division exhaustion for the whole of the Austrian wing attacking the Trombalore Heights versus Joubert's division, instead of the individual columns (Liptay, Koblos and Ocksay).
  2. To see the impact of raising the minimum unit strength to from 2 to 3.
  3. To try out potential division exhaustion counters (very much in the rough!).
  4. To be happy that there is playability for both sides.

The Test

For the these purposes, I just needed to trial the engagements on the Trombalore Heights to the north and west of Rivoli.  Not the whole battle.

The initial deployment.  The French commanding the heights, with the Austrians to the left of the photo.


Now looking from the opposite end of the height.  The Austrians are engaging pretty much along the whole line.

The Austrian's have sent one unit back and now look like they might just punch through at San Marco.  Meanwhile in the centre, the attack has been repulsed.

The two Austrian units lining up to breakthrough at San Marco.  As seen from the French point of view.

At the far end of the heights, two Austrian units are turning the French flank after throwing the 85th Demi Brigade back towards Rivoli.

Alas, the Austrian's are not so fortunate at San Marco.  They are sent reeling back as the French recover their composure.  The Austrian brigade is now exhausted, but passed their test so their morale has not yet collapsed.

The French prepare to regain their hold on the heights, but this brigade is close to exhaustion itself.

Analysis

I'd seen enough by this time to reach some conclusions in relation to my aims.

Aim 1 - I was happy that this provided a better and fairer engagement, with the Austrians attacking the heights showing more durability in maintaining it's assault.

Aim 2 - The increased minimum unit strength of 3 worked nicely.  Only exceptional dice now seems to take out a unit in one go.

Aim 3 - The division exhaustion markers helped to keep a ready tally.  I tend to keep a paper roster anyway, so this is more for the benefit of the players.

Division exhaustion tally markers - VERY much in a rough form!
The blue dice represent the casualties across the units in the division.
The white dice shows the casualties suffered in division that turn.

My army rosters for this test

Aim 4 - the above have helped.  It is still very hard for the Austrians, but more "do-able" with a degree of good timing and luck.  Plus, in the wider game other columns would be arriving.


Next Steps

The units in Liptay's column on the Austrian right have a morale grade of 4.  I'll probably lift this to match the rest of the columns at the better grade of 5.  This will hopefully resist the compounding of disadvantages in assaulting a defender in superior positions.

I might try using division exhaustion for each of the Austrian columns and on the three brigades that make up Joubert's division.  Just to see how this works in comparison.


Conclusion

Napoleon was right to order Joubert back onto the heights in the early hours of the 14th January.  Having the position, the Rivoli plateau and the central position was key.


Postscript

While the toys were on the table, I immediately proceeded with trying out the "next steps".  My subsequent findings were really helpful.

Raising the unit morale for Liptay's column was a good call.  It made the engagement closer and more tense.  But the more interesting development was altering the division exhaustion to apply to the smaller columns/brigades on both sides.  This made for increased nervous tension as lines and assault ebbed and flowed and buckled.  This concentrated the mind more on how to keep the attack and defence alive without ruining the army.  It meant that repositioning and regrouping became an active part of the game.  Whereas playing the exhaustion based on the larger wings meant that this tension was not engendered, as each side could just stand and batter each other.

I look forward to presenting this to the Rejects... who will find their ways of testing it all to destruction!


Thursday, March 17, 2022

Wargames Rules 2 - Koenig Krieg v.2

One of the first periods that the Rejects started playing was the wars of Frederick the Great (Austrian War of Succession and the Seven Years War).  Ray, Postie and I collected different armies, but somehow Postie managed to end up in possession of the lot!  He's a cunning so and so.

The rules we started with were Age of Reason (AOR).  I used to enjoy them, but did find that as games became more ambitious some the systems slowed the flow and momentum of the game.

For 18th century European wars, my go to rules are Koenig Krieg version 2 (KK v2) using either 15mm or 6mm.


Whilst probably not to everyone's taste, I found KK v2 gave me a grand tactical game that coped well with larger battles and preserved my reading of the look and feel of battles of the period.

For links to previous Rejects games try these:

From Ray

The Battle of Stoliboz - a remote game played by email with the tabletop action played out using KKv2.  This is the last report, but has the links to all the previous ones.
The Battle of Distanza - a "socially distanced wargame.  This link takes you to the first of c.6 entries in this battle/campaign.


From Lee


Austrian infantry


So, without too much detail, what is it about these rules that I like.

  1. The simple command and control mechanisms.  Units are brigaded into c.4 infantry per brigade and 2 units for cavalry brigades.  Each with a brigade general with a command radius of 4 inches.  Every unit has actions during a turn, but if outside of the command radius it can't move unless it passes a simple dice roll on 1d6 (1-2 for infantry; 1-4 for cavalry - count the legs!).  But where it really works is when contact is made with the enemy and the lines start to fracture and units have to retreat (8 and 12 inches for infantry and cavalry respectively).  So, immediately the ability to command is breaking down.  I think that this is simple and elegant.
  2. Flanks are really important in the linear warfare of 18th century Europe, and KK v2 really makes a player mindful of their flanks.  If changed by an enemy on the flank, it's not just an added bonus it's a multiplier to melee dice and modifiers.  That certainly concentrates the mind somewhat.

  3. The rules allow the meaningful existence of a second line and reserve.  A lot of rules that I've played seem to punish the idea of a second line of infantry by imposing disorder or worse if a friendly unit has to retreat through or around them.  There is no disorder in KK v2.  Nor is there routing - which means no keeping track of of morale levels.  The command rules compliment this.
  4. For 18th century European, warfare my view is that no one branch of the army is dominant.  KK v2 strikes this balance of rock, paper, scissors.  Winning a battle in KK v2 has to be an all arms affair.
  5. All of the above encourage and reward the use of 18th century linear tactics.
  6. The initiative system in KK v2 makes for interesting play and decision making about how to handle, keep or hand over initiative.  It's done on a brigade by brigade basis so all players are kept involved.  It certainly reflects my preference for a game that makes me think and have to solve problems/dilemmas.
  7. In short, the rules allow a player to concentrate on being a general rather than a sergeant.


The Negatives
  1. The production values on this version are low by modern standards, but then... not all that glitters is gold!
  2. The Prussians are given a distinct move and fire advantage for their infantry.  This can tend to make Frederick's boys too powerful.  The answer... just don't use it!  If the Prussian army has Frederick present they already have a very significant advantage in initiative rolls, and this more than compensates.
  3. There is casualty removal and some people don't like that.  In truth, I never remove casualties.  I just use tiny casualty dice.  However, I don't see these as casualties in KK v2, but more of a reflection of the degrading of a unit's combat and morale effectiveness as it directly impacts on shooting, melee and morale.

I really enjoy these rules.  So much so that I have no inclination to purchase version 3 (though I am willing to be persuaded by convincing arguments concerning its advantages).

I have never had the need to create a house rule for them, and once the scale and grand tactical nature is understood players appreciate them.  The games flow well and gives a satisfying result.

I look forward to your views on them.


Thursday, March 10, 2022

Revolutionary Wars - Artillery Reinforcements

Just a small addition to the French and Austrian forces lined up against each other in my Rivoli 1796 project.  Though it should be said that the usual disease of wargamers megalomania means that this is starting to broaden out into the whole 1796/97 campaign in and out of Italy.

The figures are the 6mm MDF flats from Commission Figurines.


French limber team


French limber team from a slightly more rakish angle


Austrian battery, plus limber.


French artillery to the left and Austrian battery to the right.  Essentially, one gun model indicates horse artillery, two guns is foot artillery.

For the pedantic you will see that the French gunners are not entirely accurate - the hats especially.  But sometimes a compromise is fine.  After all they are MDF, 6mm and flat.  Plus, most of the players won't notice once it's on the table anyway.  I think that their simplicity has a charm of its own.


Thursday, March 3, 2022

The Battle of Le Champ Glissant

Last weekend the Rejects assembled at Stuart's Shed of War for another French Revolutionary Wars game.  This time it was a fictional encounter with the sides fairly even.

The supposed context was that both armies have been maneuvering for some time in order to gain some positional advantage in the inevitable engagement.  This game represented that final jostling for position just prior to battle.

As I'm umpiring and that seems to make it tricky to take the photos and annotate key events, I'll leave the detailed reporting of this tabletop affair to my fellow Rejects.

Click here for Lee's report.


The Players

Rejects Ray and new boy Steve were the Austrians.

Rejects Lee and Surjit played the French

Stuart, while graciously allowing us to use his shed and still recovering from a bad cold, chose to spectate and provide the very handsome lunch.


The Briefings

The Battle of Le Champ Glissant, 9th September 1796

French Briefing

You have been desperately trying to fulfil the orders of the Directory and push the Austrians back onto the Danube and to then link up with the Army of Italy in order to force the Austrian Emperor to make a peace.  However, Archduke Charles has been handling the imperial army well.  He has been manoeuvring just enough to ensure that you do not have the advantages you would wish for.

But at last, you have brought him to battle.  Though can you find the most advantageous positions in order to incapacitate the Archduke’s army?


The Battle of Le Champ Glissant, 9th September 1796

Austrian Briefing

You have heard of French successes in Italy, and you realise that it is important to prevent a French breakthrough from the Rhine to the Danube and thus to Austrian defeat. 

You have, so far, successfully avoided a pitched battle whilst also frustrating your opponent.  However, the French have now been able to bring about an engagement.

You first need to manoeuvre to gain some positional advantages before attempting to eliminate the threat of an invasion of Austria by incapacitating the French army before you.


The Armies

Austrian

Commander in Chief – Archduke Charles


French

Commander in Chief – General Moreau


Rating


Rating

1st Division

Duke Ferdinand of Wurttemberg


1st Division

General Desaix


IR4 Deutschmeister

Line


Grenadiers

Vet

IR13 Reisky

Line


4th Demi Brigade

Line

IR24 Preiss

Line


5th Demi Brigade

Line

IR27 Strassoldo

Line


Medium Artillery 1

Line

Medium Artillery 2


Line


2nd Division

General Delmas


2nd Division

FML Petrsch


51st Demi Brigade

Line

IR51 Splenyi

Line


69th Demi Brigade

Line

IR25 Brechainville

Line


75th Demi Brigade

Line

IR43 Thurn

Line


85th Demi Brigade

Line

Medium Artillery 4


Line


3rd Division

General St Cyr


3rd Division

Count Wartensleben

Line


14th Demi Brigade

Line

Illyrischer Grenzers

Line


19th Demi Brigade

Line

Szluiner Grenzers

Line


57th Demi Brigade

Vet

Carlstadter Sharpshooters

Vet


Medium Artillery 2


Line

Light Artillery 1


Line


4th Division

General Beaupuy


4th Division

Baron von Kienmayer

Line


Legion d’Allobroges

Line

IR29 Kerpen

Line


12th Demi Brigade

Line

IR14 Klebek

Line


6th Demi Brigade

Line

IR8 Huff

Line


Carabiniers of 4th Legere

Elite

IR49 Pellegrini

Line


Cavalry Division

General Laroche


Light Artillery 3

Line


5th Dragoons

Line

Cavalry Division

FML Meszaros


20th Dragoons


Line

2nd Hussars

Vet


Stabsdragoner

Vet


Victory Conditions

The following was used to calculate the victory points at the end.

7 points For each broken enemy division

5 points For each enemy division with 50% plus losses but not broken.

3 points For each enemy division with 25-49% losses but not broken.

1 point For each enemy standard captured.

1 point For each melee won


The Starting Table

The tabletop terrain was set up quite simply as this was going to change shortly.

The starting terrain

The Game of Position and Deployment
The idea about the start of this game is that both sides were still trying to out-maneuver each other to gain some sort of positional advantage.

To replicate that we played out a pre-game phase where the opposing sides could draw and play cards alternately to add, move, remove terrain and to move or delay the enemy divisions.

First of all, the players placed blinds representing their divisions plus a couple of dummy blinds.

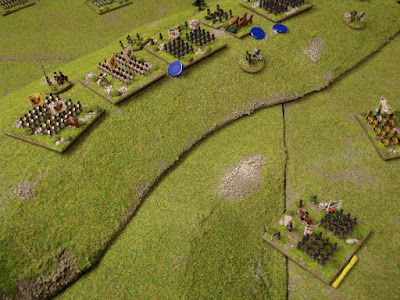
They then played the pre-game card game.  The photo below shows how the terrain has changed and where the blinds are.

The new battle field.  The French will be deploying on the right.

The players now had 5 minutes to take as many photos as they liked then had to leave the shed to formulate their actual troop positions in the 2 foot squares and an overall plan.  This gave me a chance to place the figures in the appropriate squares on the table.

Upon their return, the players had ten minutes to redeploy in the allocated squares.


The Battle
As you will see the Austrians successfully bottle necked the French infantry in the centre.
Both sides found their cavalry facing infantry on the flanks.

The starting positions for the Austrians on the left and the French on the right.

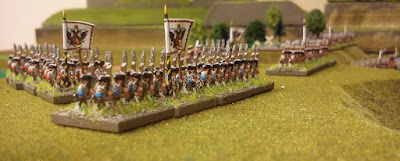
The French start to unpack their infantry that is massed in the centre.

French work themselves into some sort of battle line in order to better coordinate their assault on the more defensive Austrians.  The cavalry on both flanks hover around to occupy their respective opponents.


French columns, having been screened by swarms of skirmishers, now charge into the Austrian centre.


French skirmishers in front of the columns are about to withdraw to let the columns through.


The columns took a lot of damage going in and especially in the woods.  However, the Austrian line has buckled and been forced back.


Unfortunately, Lee is unable to press the attack without Surjit's divisions engaging further down the line... which they have not.  So Lee has had to pull back.  His divisions are suffering and exhaustion is a real issue for his commands.


Surjit's French columns are now advancing down the far end, and Lee's dragoons are now advancing towards the centre.  However, night has fallen and the battle ends with the Austrian significantly pushed back in the centre.


The points were counted and the French, Lee and Surjit, were declared the winners... by ONE point.  As you you see on the chart below


Analysis
Losses to Austrian Forces:
1st Division - 10%
2nd Division - 0%
3rd Division - 37.5%
4th Division - 0%
Cavalry Division - 37.5%
Army losses - 12.5%

Losses to French Forces
1st Division - 21%
2nd Division - 43%
3rd Division - 33%
4th Division - 0%
Cavalry Division - 0%
Army losses - 23%

You can see from the numbers above the French 2nd and 3rd Divisions were the ones assaulting the Austrian centre, which was mainly held by their 3rd Division and part of the 1st.

1.  French casualties on approach and on charging in were high.  This did lead to both French Divisions having to take division tests, which was where the Austrians got most of their victory points from.  It also meant that Lee was struggling to renew his attack.  The Austrian defensive position did enable them to pour plenty of lead into the columns.

2.  Despite their good shooting and position, Ray and Steve were unable to win sufficient melees.  French prowess in melee, and the capture of standards, racked up the points for them.

3.  Ray and Steve were also dogged with poor dice rolling for morale and rally tests, e.g. "don't roll a 6 Ray," which is exactly what he did.

4.  2 and 3 above meant the Austrians were pushed back in the centre, thus losing their position there.

5.  However, the French were unable to follow up the hard won advantage.  Especially with Surjit's divisions not close enough to engage or support.

6.  The blind deployment and the pre-game phase led to both flanks causing some hesitancy about what to do.  In the end, each side's cavalry division pinned an opponent's infantry division.

7.  The pre-game phase and blind deployment, I think, worked well to create dilemmas for the commanders and uncertainty preceding the battle.

Overall, I was pleased with how my rules worked.  They gave a sense of ebb and flow in the fortunes of the two armies.  Command and control degraded nicely as contact was made, the lines became ragged and as morale was being eaten away.  The small alteration to the rally rules worked well, though I need to make a little amendment to skirmishers in melee.

For the scenario, I might consider altering the victory points to assign 1 extra to each of first three.  As it stands, it was a good game and if it was a French victory, then it was very much a pyrrhic victory.  I think the French and Austrians will continue to maneuver on the Rhine for the foreseeable future.