Showing posts with label Medieval. Show all posts

Wednesday, January 28, 2026

The Battle of Wakefield, 1460 - A War of the Roses AAR

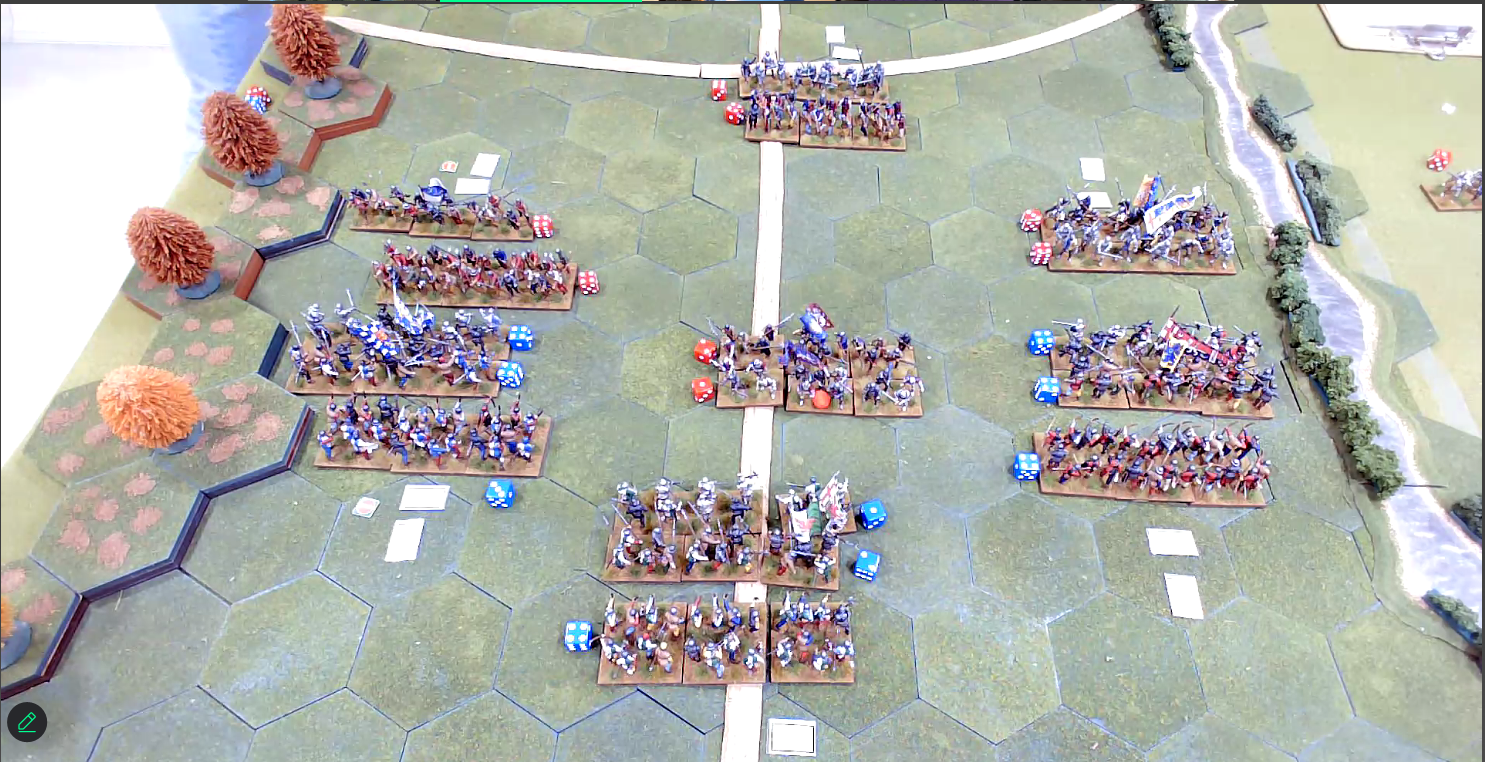
Jonathan Freitag and I took to the remote gaming table to stretch our hands across the Atlantic and fight his interpretation of the War of the Roses Battle of Wakefield (see here for his details).

An in-play photo, courtesy of J. Freitag

I took command of the Yorkists while Jonathan led the Lancastrians.

The initial deployment.
Rutland's archers overseeing the wagons en route to the castle.  The Duke of York rushing out to engage the Lancastrians.

While the wagons move slowly, York's Battle advanced aggressively towards Somerset and the newly arrived Northumberland.

Yorkist reinforcements arrive in the guise of Salisbury and his Battle.

Meanwhile York, hoping to gain a swift advantage, charged Northumberland's troops.  However, things do not go to plan.  Northumberland repels York's efforts but his men force him to fall back to reorganise.  Somerset now crashed into York throwing him back further.  But at the moment of victory, Somerset is wounded and has to be carried from the field.

With Clifford having arrived on the field to support the Lancastrian left, Northumberland hurled his men at the Duke of York's faltering Battle.  The melee is brutal.  In the crush the Duke of York is struck down, dead!  York's Battle is now a broken unit.

Rutland's archers on the Yorkist left keeps up a constant rain of arrows but to limited effect as Somerset and Clifford move to strengthen the Lancastrian battle line.
Salisbury moves forward to support the remnants of York's tattered Battle and shield the creeping supply wagons.

Hoping to reverse the situation, Salisbury launched his men at arms into Northumberland's depleted Battle.  

Northumberland's men at arms are annihilated as Salisbury's warriors sweep forward.  However, little do they realise that in the swirl of melee Salisbury is struck down and mortally wounded.  Seeking to wipe out Northumberland, Salisbury's now leaderless troops pursue and crash into Somerset's men.  The Yorkists are thrown back at great loss...

... and back again as Somerset is relentless in the pursuit.

The remaining Yorkists are not given a chance to rallying as Somerset's men deal out more slaughter.  Salisbury's Battle breaks under the strain.

With two of the three Battles broken, the Yorkists flee the field.  This has been a disaster for the Yorkist cause.  Two leaders dead on the field.  One of them the Yorkist leader himself!

Afterthoughts
By choosing to play the Yorkists, I knew that this was going to be a very tough battle to get a victory.  However, that did not stop this game being a tremendous amount of fun.  The challenge was to better the Yorkist performance.  Alas, I believe history was repeated.

A thoroughly enjoyable game.  Well done, Jonathan.


Wednesday, November 19, 2025

Battle of Zallaqah, 1086 - AAR

Jonathan (Palouse Wargaming Journal) and I got together to fight this engagement from the Spanish Reconquista.  Having performed abysmally in the game as one of the Rejects, I was hoping for at least a glimmer of sensible of tactical ability and perhaps the even application of the laws of probability.

I took charge of the Christian army.  Jonathan controlled the Muslim forces.

The Christian army deployed with all the knights out front.

The view towards the Muslim army.  There were quite a few long spear units with archers attached.

My plan, as far as I had one, was to nullify or at least delay the Muslim light cavalry on my right from harassing my flank.  Then, go all out with the knights while forming all my spear units into a block.

... let's see what happened.

With the initiative, I threw my right wing light cavalry straight into the Muslim light horse on the hill.  Their success was stunning.  Two enemy units were beaten and chased back to the rear of the own army.  First job for the Christian army done!  No irritating light cavalry to worry my right flank.

Now for the right wing knights!
With the Muslim skirmishers failing to evade, they were quickly despatched leaving the enemy spear units exposed.  The knights did the job in beating and throwing those dangerous units back, but failed to pursue.

 It was now the turn of the left wing knights. Their charge forward meant more skirmishers were trampled before another Muslim spear unit was decimated but not destroyed.

The Christian cavalry had inflicted significant damage to their opponents and pushed the Muslim front line back.  However, they had failed to pursue and deliver a fatal blow.

The space gained by the knights allowed the following infantry to slowly trudge forward...

...and form a solid battle line.
The battle now went through a bit of a lull.  Charges and melees occurred, forcing the right wing knights to retire, but more energy was devoted to redressing the lines. 

As the Muslim forces organised themselves and advanced, the knights showed signs of wear and tear.  It was becoming clear that the early impetus and advantage of the Christian king was gone.

The Muslim army crept forward as the Christian forces braced themselves.

In concert with their medium cavalry, the Muslim spears threw their weight against the right wing knights.  Unable to resist, the cream of Spanish chivalry was annihilated.

Right wing crossbow countered the Muslim cavalry threat to the infantry flank.

It was evident that the moment of crisis was approaching and that both sides needed to win the initiative and take decisive action.

Alfonso was first out of the blocks.  The remaining knights pounded forward on the left and caused havoc on the Muslim right.  However, it came at great cost as one unit of armoured cavalry was destroyed and the other failed to capitalise on its initial success.  Nonetheless the Muslim right was now substantially damaged.

The engagement was now going to be decided in the centre by the infantry.
Sensing the urgent need to confound the Muslim spears and anticipate their assault, the rightmost Christian spear block charged.

This was the start of a titanic clash of flesh and metal to win the battle - this was the start of the "do or die" climax.

With great fury, the Christian spears dealt out out death.  Decimated by the attack, the Muslim spears were forced to retire.  However, the effort left the attackers unable to pursue.
Having set the example, the next unit of spearmen leapt forward and charged the isolated Muslim spears.

After a savage engagement in which the Muslims suffered greatly, the defenders were compelled to retreat.  But this time the Christian spears did not let the the advantage slip and charged again.

... and in wiping out the remnants of the unit, the Muslims decided it was time to retire from the field.

The last struggle in the centre was vital.  With both armies hanging on the verge of collapse, success here was a matter of survival.

So... the result!  We agreed that with both armies so close to collapse by the end, a draw was the right decision.  Even if one could argue a Christian victory, the truth was that both sides were so damaged that any victory would have to be considered hollow, or pyrrhic.

After thoughts
The game took exactly two hours of playing time.  That was the greatest fun.  So much action.  So many decision points.  The evening was an absolute blast and I left it buzzing!

The battle started with amazing Christian successes.  The Muslims then recovered and reorganised; taking the fight back to the Christians.  The initiative was evenly distributed throughout.  I would also say that the dice treated both Jon and I evenly and fairly overall.

Jonathan was a gracious host, fair and honest umpire, and a worthy opponent.  Great work, great time.


Monday, November 10, 2025

The Battle of Swanage Bay, 1471- A War of the Roses AAR

Postie summoned the Rejects to his shed to fight a fictional War of the Roses engagement, the Battle of Swanage Bay.

The context for the game was that, after the Battle of Barnet, Margaret of Anjou returned with an army and treasure to assist the Lancastrian cause.  Storms had driven her fleet to land on the peninsular at Swanage Bay.  King Edward, aware of Margaret's arrival rushed to "greet" her.

Lee and Surjit commanded the Lancastrians.  Colin commanded the bulk of the Yorkist troops while I led the Yorkist left against the town.

This would turn into a game dominated by exception (extraordinary!) dice rolling.

The Lancastrian occupied the town and the left of the field.  Two Yorkist battles faced the disembarking Margaret, while the third (commanded by me!) faced the Lancastrian right flank anchored on the town.

Surjit's battle defending the town.

Colin's two battles ready to drive Margaret back into the sea.

Two Lancastrian battles disembarking.  These were controlled by Lee.

The left of Edward's (Colin) troops.  The plan was to expose the gap between the town and the Lancastrian troops by the ships and force them apart.

Hastings' (me) battle facing the town.

This is going to be a tough nut to crack.  Archers behind hard cover defending the town.

Hastings' troops start their slow advance.  The defending archers shoot with deadly effect against my longbowmen.

... and so the exceptional dice rolling begins.
First, despite the Yorkists having an edge on initiative, the Lancastrians gain it to move and shoot first.

As Edward's men began their slow trudge across the field.  The Lancastrian obtained the hills and rained arrows down on the Yorkists.

Second, Completely defying all rules of probability.  The Lancastrian archery wiped out about a third of the Yorkist bowmen before they could reply.  In these rules, if you move first you shoot first.  Then the return shooting is based on what you have left to shoot with.  In response, the Yorkist longbows could barely scratch a barn door.

Hastings continues his advance.  The defenders' missile fire cripples a retinue bow unit.

Further down the field, Edward's men are dropping like flies.

Third.  Yet another chance distribution curve defying moment.  Edward's troop can't move without being mown down.  Causing Colin to have to make his first of a number of Battle morale checks.

Lancastrian shooting drives the retinue bowmen back.  However, the Yorkist shire bowmen unleashed a good volley to destroy a defending unit of archers.  This was shock enough for the whole defending battle in the town to recoil and leave their positions.


Hastings now took the opportunity to get his remaining archers to the barricades and shoot into the rear of the Lancastrian billmen.

Meanwhile, the other two Yorkist battles were struggling against mounting losses from the enemy archery.

So devastating and targeted was the missile fire from the Lancastrians that one of Edward's battles had to take another morale test and failed.  This led to a rout off the table...

... Game over.  A great and emphatic Lancastrian victory.

After thoughts
Well played by all involved.  Games of this period never permit tactical finesse and manoeuvring.  In that sense, nobody played a good or bad game.  The table was lovely to look at and the figures gorgeous.

Lee's dice rolling was phenomenal.  He was scoring hits in numbers that was incredible and utterly unbelievable unless you saw it with your own eyes.  It would be true to say that such extraordinary dice rolling made it impossible to play against Lee.  It made the game almost unplayable for anyone opposite Lee.  Kudos to Lee.

We actually started playing the game at about 10.30am.  It was over by 1.00pm!  Probably the quickest game that I've ever played in the shed!

On the plus side, it meant that we enjoyed a pleasant, chatty and leisurely lunch.

For a fuller report, have a look at Lee's blog when he posts it.

The figures were all 28mm and the rules were Stuart's own.


Thursday, June 26, 2025

The Battle of Mortimer's Cross, Feb. 1461 - A Brief AAR

Jonathan took his War of the Roses rules to the next level and exposed them to the Rejects to stress test them. Or, for those of a certain age, put them to the Tonka Toy test!

For other reports and information, I refer you to The Palouse Wargaming Journal.

Dan and Lee commanded the Yorkists.
Steve and I took charge of the Lancastrians.

The initial deployment at the start of the battle.  Yorkists are closest to the camera.

This is the player information Jonathan sent to each of us:

"Battle of Mortimer’s Cross
Jon Freitag
SITUATION
The Battle of Mortimer's Cross was fought on 2 or 3 February 1461, near Mortimer's Cross in
Herefordshire, close to the River Lugg and the village of Wigmore. When Edward heard news
of his father and brother’s death at Wakefield on 30 DEC, he prepared to move to London to
join Warwick. Hearing that a Lancastrian Army was moving in his rear near Hereford, he
moved to intercept. They met at Mortimer’s Cross. Taking the title, Duke of York, Mortimer’s
Cross was Edward’s first independent command.
On the morning of the battle, a meteorological phenomenon called a parhelion (or "sun dog")
appeared, causing three suns to be visible in the sky. Edward used this as a powerful omen,
telling his troops it symbolized the Holy Trinity and divine favor, which boosted their morale.
The "Sun in Splendour" became Edward’s personal emblem.
ARMY SIZES
Both armies have three Battles. The Lancastrian Army has commands of Jasper Tudor
(Pembroke), his father Owen Tudor, and Wiltshire. The Yorkist Army has commands of
Edward IV, Devereaux, and Herbert.
LANCASTRIAN ARMY
Pembroke – 1x Men-at-Arms (CE6), 1x Household (CE7), Retinue Archers (CE4),
Retinue Billmen (CE5)
Tudor – Men-at-Arms (CE6), Retinue Archers (CE4), Retinue Billmen (CE5)
Wiltshire – Men-at-Arms (CE6), Array Archers (CE3), Array Billmen (CE5)
YORKIST ARMY
Edward IV – 1x Men-at-Arms (CE6), 1x Household (CE7), Retinue Archers (CE4),
Retinue Billmen (CE5)
Devereaux – Men-at-Arms (CE6), Retinue Archers (CE4), Retinue Billmen (CE5)
Herbert – Men-at-Arms (CE6), Retinue Archers (CE4), Retinue Billmen (CE5)"

The flanks of both armies advanced.  Meanwhile the central battles played it more cautiously.  Jonathan used the "chat" option of Zoom so that each player supplied their orders separately and secretly.  Hence the centres on differing orders!

The right Yorkist battle, led by Tudor (Steve) charged into the Herbert's battle (Dan).

After a prolonged struggle, Tudor is forced back.

On the left flank, the Yorkist Devereaux (Dan) flung his battle at Wiltshire's (Steve).

Wiltshire is initially pushed back, after both sides took heavy losses.

Whilst the Yorkist centre (Edward IV commanded by Lee) struggled to change orders, the Lancastrian Pembroke (me) advanced quickly...

... and seizing the initiative charged the king.

Only for Pembroke to be pushed back...

... and back.  On the positive was Edward having the leave the field wounded.
Wiltshire on the Lancastrian left now took the fight to Devereaux.

Despite resistance, Wiltshire threw Devereaux back with loss.  Elsewhere on the battlefield things are looking grim for the Lancastrians.  Both Pembroke and Tudor being forced back and suffering losses.

With both sides with commanders dead or wounded on the field and each with a broken battle, things are reaching a critical moment.  The Lancastrian centre and right looking particularly vulnerable.

However, with some sterling archery from all Lancastrian battles, an initial Yorkist attempt to break Pembroke's battle was thwarted and Herbert's broken in turn.

So, from the jaws of defeat the Lancastrians rescue a victory!

We all thoroughly enjoyed this tense, fierce and fun encounter.  There was a great ebb and flow to the battle.  Jonathan's rules really played well and I look forward to reading his report of the game.


Most Popular Posts