Last weekend saw a gathering of the Rejects in Postie's Shed of War. This time to play a game organised by me not Stuart.
This was a fairly loose interpretation of the Battle of Castiglione on 5th August 1796, with a slightly different "sauce" from the historical events. The players had a degree of latitude in their deployment, a couple of terrain features are absent and the units on the table are not the named units that fought on the day. Alas, the limits of my collection.
 |
| By Victor Adam |
Brief Background
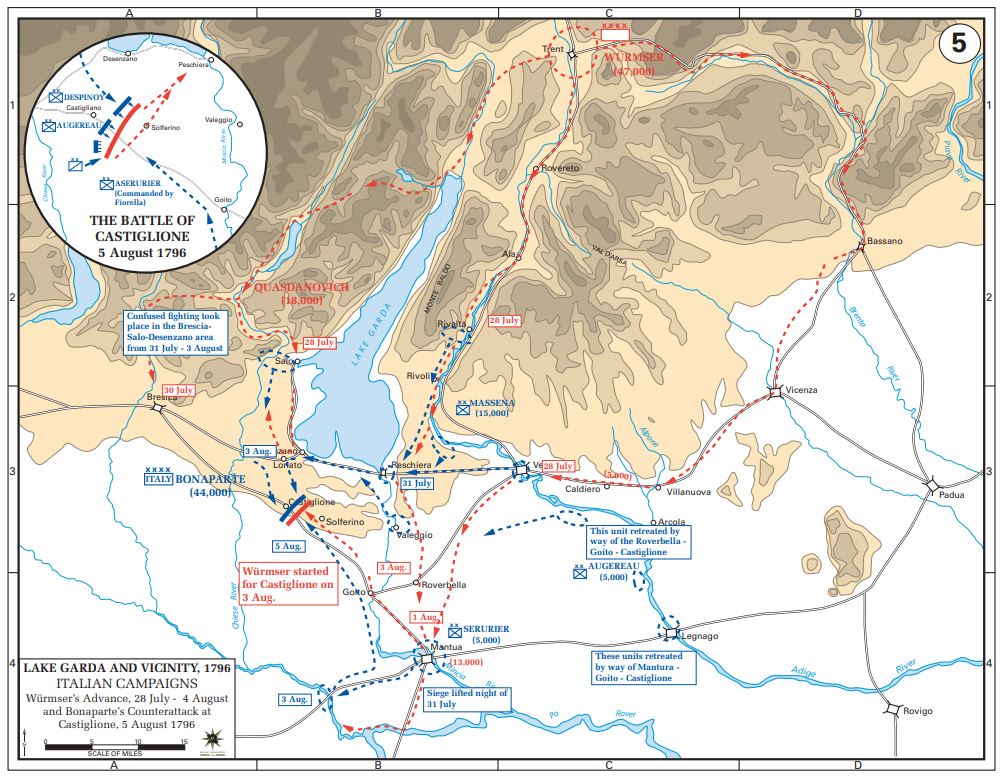
Napoleon and the Army of Italy had pushed the Austrians out of the northern Italian plain and were laying siege to the Austrian led fortress city of Mantua. The imperial Field Marshall Wurmser wanted to lift the siege and relieve Mantua, thus also pushing the French back westwards along the river Po. In order to do this Wurmser split his army in two and sent each half down each side of Lake Garda with the aim of crushing Napoleon in this pincer.
 |
| The strategic map of Lake Garda of August 1796. |
Unfortunately for Wurmser, by Napoleon having the central position, the western army under Quasdanovich was defeated and fell back towards the Tyrol. This meant that the revolutionary army could now face Wurmser as he approached from the east.
The Forces
The army lists are as follows:
|
Austrian Commander in Chief - FML Wurmser |
|
French Commander in Chief – General Buonaparte |
||
|
|
Rating |
|
|
Rating |
|
Division
General Melas |
Line |
|
Division – General Massena |
Vet |
|
IR29 Kerpen |
Line |
|
6th
Demi Brigade |
Line |
|
IR25 Brechainville |
Line |
|
75th
Demi Brigade |
Line |
|
IR14 Klebek |
Line |
|
85th
Demi Brigade |
Conscript |
|
IR8 Huff |
Line |
|
57th
Demi Brigade |
Vet |
|
Artillery |
|
|
Carabiniers
of 4th Legere |
Vet |
|
Division - General Davidovich |
Vet |
|
Artillery |
|
|
Szluiner Grenzers |
Line |
|
Division – General Augereau |
Vet |
|
IR24 Preiss |
Vet |
|
4th
Demi Brigade |
Line |
|
IR4 Deutschmeister |
Line |
|
69th
Demi Brigade |
Line |
|
IR13 Reisky |
Line |
|
14th
Demi Brigade |
Line |
|
Artillery |
|
|
19th
Demi Brigade |
Line |
|
Division – Sebottendorf |
Line |
|
51st
Demi Brigade |
Line |
|
Illyrischer
Grenzers |
Line |
|
12th
Demi Brigade |
Line |
|
IR51 Splenyi |
Line |
|
Grenadiers |
Elite |
|
IR43 Thurn |
Line |
|
Artillery |
|
|
IR27
Strassoldo |
Vet |
|
Cavalry Division – Marmont |
Vet |
|
Artillery |
|
|
5th
Dragoons |
Vet |
|
Cavalry Division – General
Placzek |
Vet |
|
20th
Dragoons |
Line |
|
2nd
Hussars |
Vet |
|
10th
Chasseurs a Cheval |
Vet |
|
Stabsdragoner |
Vet |
|
Reserve – General Despinoy |
Line |
|
Reserves |
|
|
5th
Demi Brigade |
Line |
|
Carlstadter
Sharpshooters |
Vet |
|
Legion
d’Allobroges |
Conscript |
|
IR 49
Pellegrini |
line |
|
|
|
In order to provide a little fog of war, I have kept from the players the exact quality rating of each unit. In fact, I may have been slightly "ambiguous" here and there. Plus, casualties will not be marked on the tabletop units. I will record them.
The Players
Austrians
Wurmser/Melas - Ray
Davidovich - Lee
Sebottendorf and Placzek - Surjit
French
Napoleon/Massena - Mark
Augereau and Marmont - Postie
Deployment
The table was set up based on this rough hand drawn map.
 |
| Umpire's map of the Battle of Castiglione |
Austrian
Melas Division could deploy in a box A1 to C3
Davidovich in B2 to C6
Sebottendorf in B6-B7, C7 to D8
Placzek and reserves could be deployed anywhere along A row after the French deployment.
French
Massena could deploy in squares F1-F3
Augereau in F3 to F5
Marmont in squares F7 to F9
The reserves could be deployed anywhere along the F row after the Austrian reserves had been deployed.
Player Briefings
These were the briefings given to each side.
French Briefing
However, Wurmser’s army threatens to now push you back west towards Lombardy and Piedmont.
You have had to lift the siege at Mantua to deal with the Austrians.
You have sent orders to Fiorella to march from the southeast to smash the Austrian rear.
You must push back the Austrians. If you capture the heights and Solferino you can cut off Wurmser’s line of communication, and hopefully force him back into the Tyrol.
Your line of communication is the road west to Castiglione.
Austrian Briefing
In order to complete the relief of the besieged city of Mantua, you need to hold the French and force them west and away from Mantua.
Your line of communication is toward Pescheria. If things go badly a retreat towards Mantua could spell disaster as you may find your army trapped there.
If you can cut the French line of communication back to Castiglione this may eject the French and force them towards Piedmont and west.
You are aware that French troops may lie to the south or southeast, but no contact has been made to determine their exact whereabouts.
The Battle
For a better report of the battle itself have a look at Lee's blog and Ray's blog.
In the meantime here are some truly awful photos of the progression of the troop positions.
 |
| After deployment. The troops are arrayed. Most of the fighting will be down this end and in the centre. You can just see Postie and Mark doing some serious chin rubbing as they ponder. |
 |
| The French line on the left advances. |
 |
| The opponents start moving into musketry range. |
 |
| At the far (southern) end of the table Austrian and French cavalry clash. The Austrians are the immediate winners, which quickly evaporates once their hussar regiment pursues the French off the table. |
 |
| Postie has been making slow progress in the centre as Lee continues to backstep his division. However, the situation close by is very much in the balance. |
 |
| The worst photo! Mark cracks open Ray's command. However, even though the Austrians are obliged to retreat, the French soldiery is too exhausted to follow up. The Austrians have won a tactical victory but suffered a strategic reversal. |


Excellent battle report Richard. Very interesting to see the differences between your report, my own and Rays. I guess its a matter of perspective...now if we could only Postie or Mark had a blog we could have had a viewpoint from the other side as well.
ReplyDeleteGlad to see you finally accepting the inevitable and joining the ranks in the Blogosphere BTW.
I thought that I would give it a try and see how it goes.
DeleteIt's hard to write up a game that you umpire as well. So, I do rely on you to give a more detailed report.
Great report Richard. It was a crackin game to play and was very close all the way through.
ReplyDeleteThanks Ray. It certainly was nail biting... real ebb and flow.
ReplyDelete