Jonathan of Palouse Wargaming Journal graciously hosted his Battle of Shiloh for the Rejects.
Ray and Steve commanded the Confederate attackers while Lee and I controlled the surprised Union troops.
For the background to his excellent and challenging scenario follow the link to the post "my-god-we-are-attacked".
What follows is a quick round up... probably largely representing the Federal view of events.
 |
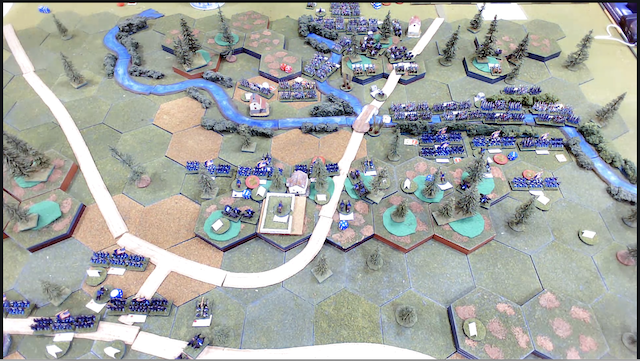
| The starting positions. |
I took command of the two brigades on the right of the line - Buckland and McDowell. Lee had command of the left of the road with Hildebrand and Raith's brigade which were unable to activate until either turn 5 or in sight of the enemy.
 |
| The rebels started by occupying the creek facing the Federal right and destroying Hildebrand's 53rd Ohio that were taken by surprise on the wrong side of the creek on the left. |
 |
| As the Confederates begin to mass against the Yankee right, McDowell and Buckland push units off the hill to contest any free movement out of the creek. The aim being to delay and then have the space to give up and trade for time. |
 |
| The Confederates continue to mass their troops on the right, whilst slow movement is occurring on their right. They seemed to be struggling to bring on all their reinforcements in a speedy and effective manner. |
 |
| The Rebels with a yell launched themselves out of the creek... |
 |
| ... McDowell's lead units on the Union far right are beaten back from the creek with heavy losses. |
 |
| Keeping up the pressure, the Confederates hurl Buckland's boys in blue back to the hill. |
 |
| The Rebels have a foot hold on the Union side of the creek. The blue line is starting to look thin as Buckland pulls a regiment away from Shiloh Church to reinforce the right. |
 |
| With the Rebs swarming over the creek, McDowell's and Buckland's brigades takes a pounding. Even McDowell is killed in the thick of the action. |
 |
| The pressure is relentless on the Union right. Meanwhile Raith's brigade stands unable to activate. On the left the Confederates are slowly getting their forces together, though their progress there and in bringing forward their reserves is slower than they might wish. |
 |
| The Federal right is all but broken. McDowell is dead and only one skeleton regiment is left of that brigade. Buckland survives, but only one regiment holds. It's not looking good!!! Which is a gross understatement. |
 |
| The odd Rebel unit stops to pillage and loot the Union camps... but not nearly enough of them. However, Raith is now alert to the danger and moves forward on the Federal left to counter the Confederate troops now massing to cross. |
 |
| The Rebels surge across. However, they break against Raith's stubborn defence. |
 |
| Meanwhile on the right, the Rebels complete the annihilation of McDowell's and Buckland's brigades. |
 |
| With the Union right completely open and the plodding Rebel reinforcements now in a position to move over the bridge, the Union concede and leave the field of battle to the Confederates. |
Conclusion
What a great and challenging game. Confederate numbers really told. But the most devastating was Steve's dice rolling. The Union right scored plenty of hits against the attackers only to see the vast majority of them being saved.
I think that moving to the creek to impede their easy crossing was the right thing to do. This was always going to be a fighting withdrawal. My view was that I needed to move into the space in order to make every hex a contested hex. I will now ponder on the wisdom of this decision. Lee did well on the left. Thankfully the Confederates struggled to bring all their troops to bear in a speedy manner. Nonetheless, they had enough.
A really enjoyable game. Thanks to Jon and the players.


Great report Richard, you had a very difficult job on your hands. Moving forward to the creek was dangerous but I think it was the right thing to do. As for Steve's dice rolling??? What can I say, except I was glad he was on my side???
ReplyDeleteIt was a difficult job Ray, but it should be said that you and Steve played well.
DeleteI have been enjoying Jonathan's previous AARs on this battle so it was great to see you guys in action. The Confederates seemed to really get stuck in here.
ReplyDeleteThanks Lawrence. The Confederates definitely wanted to make their numbers tell as quickly as they could.
DeleteA fine view from the Union side there Richard:). As you say, a fighting withdrawal is really the only option, or at least that's how I view it, trying to hold on until reinforcements arrive the next day.
ReplyDeleteCheers Steve. Just a shame that I had nothing left to withdraw.
DeleteTough old game and a fighting withdrawal is all you can do while giving the rebels a bloody nose, sounds like you did that!
ReplyDeleteBest Iain
Thanks Iain. Not sure how much of bloody nose we really gave the Rebels.
DeleteExcellent accounting of the action, Richard. The Federal Right, saw a lot of pressure from the Rebels. Too much pressure. Based upon your history of defying laws of probability in the left tail of the distribution, your rolling in this game actually shifted into the middle of the distribution. Had you even seen average enemy responses, your bold plan to advance to defend Shiloh Creek may have delayed Confederate attacks for a couple of turns at a minimum or shot them to pieces with some luck. Given Lee’s staunch defense on the Left, that may have been enough to destroy the Rebel time line.
ReplyDeleteWhat is the best plan of action for Sherman? I am still not sure. We need more trials under our belt to better assess possible solutions.
Thanks again for playing. It was an enjoyable but perhaps frustrating game.
Thank you for the game Jonathan. I have reflected on my dice rolling in this game and it was overall average. So, no complaints. At least that side of my game has risen to the norm.
DeleteExcellent write-up of the game. I think we had the tougher task so did as well as could be expected. The revs toughest challenge seemed to be getting stuff onto the table through their own traffic jam.
ReplyDeleteA nice challenge to bring on more troops.
DeleteGreat report Richard but this game does seem a hard one for the Union to prevail in, without the intervention of some good luck!
ReplyDelete